
Welcome to this tutorial book on the new Scrivener V3 for Windows.
A Little Background
Scrivener was initially developed by English author Keith Blount when he could not find a program to organize his writing the way he wanted. Over the years Scrivener has built a deserved reputation as one of the best programs available for long form writing.
Though in his own words, a ’wannabe novelist’, Keith has responded to input from users and developed Scrivener to cover fiction and non-fiction, screenwriting and poetry. In my own experience of Scrivener, I have found it useful for novels, non-fiction, university assignments, and blogging.
Initially developed on Mac and intended to remain only on that platform, Keith was approached in 2008 by Lee, who was studying a Master of Science in Software Engineering at Oxford University. Lee, had found Scrivener useful for his dissertation and fiction writing but was not happy at having to buy a Mac for this one piece of software.
In his initial approach he asked if there were plans for a Windows version, to which Keith responded there were not.
Over almost a year Lee pushed the concept of a Windows version, offering to undertake the development. Keith finally agreed and the process of developing Scrivener for Windows began.
In Lee’s own words, he did not appreciate the power and complexity Keith had programmed beneath Scrivener’s deceptively simple interface. Over several years, the first version of Scrivener for Windows was developed and released, by that time well behind the ever improving Scrivener for Mac. Tiho joined as the second member of the Windows development team and development of Scrivener for Windows 3 was announced.
Lee and Tiho have chased the ever moving target that is Scrivener V3 for Mac, developing the underlying structure of the Windows version and adding each new V3 Mac feature to the list of required functionality.
For those writers who languished on Scrivener 1 for Windows since late 2017 while they watched the many additional features available to the Mac community, the wait has been long and the Literature and Latté Windows beta forum has been the scene of many ‘are we there yet?’ appeals.
Windows does not include many of the development aides built in to MacOS, resulting in Lee and Tiho having to develop Scrivener 3 for Windows from the ground up with third party development tools, adding to their challenge.
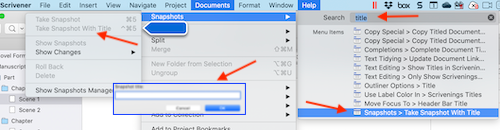
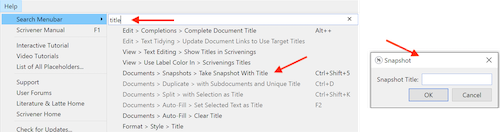
As an example, with the inbuilt Mac tools, it is possible to have the help menu search point to the menu item you need and allow you to click on that item to select per the Scrivener 3 For Mac example below.
No such development tools exist within Windows, and while the team have not achieved exactly the same look and functionality, Lee and Tiho have achieved something extremely close, and what’s more something I have yet to see in any other Windows program, including from Microsoft or other cross platform applications such as Affinity Photo.
This is a major achievement, indicative of their commitment to developing the best application possible within the limits of available development tools.
With the release of Scrivener for Windows V3 Literature and Latte, have provided writers with a modern, full featured writing platform on par with Scrivener 3 for Mac. Of major importance, the Scrivener project files on both Mac and Windows V3 versions are now fully compatible.
📝 If you also write with Scrivener for Mac, I have also released a book covering that version. While the content is much the same as this book, screenshots and menu selections relate to V3 for Mac.
The Aim of This Book
This Scrivener V3 For Windows book is focused on authors wishing to write with the recently released Scrivener Version 3 For Windows. While I shan’t attempt to teach you how to write, I’ll guide you through the Scrivener process focusing on the main points supported by images wherever possible.
I aim to take you from a beginner with little or no Scrivener experience to self-publishing your first book with Amazon, Apple, and other eBook publishers, or submitting a manuscript to an agent or publisher.
“But Scrivener is hard to learn!”
You may have heard Scrivener is difficult to learn. Forget that.
Scrivener is very easy to learn for the basic tasks needed to write and self-publish or submit a book. Yes, it has very powerful features under the hood. Like large programs such as Word and Excel, many Scrivener users never explore the most sophisticated features. There is a learning curve to obtain the most from the program. However, you can be ready to start writing after a run through the basics.
As I assume most readers will be unfamiliar with Scrivener and seeking assistance in getting their first project off the ground, I’ll start with the basics and lead into more advanced topics. Readers with some exposure to Scrivener wishing to become familiar with Version 3 can skip chapters as best suits you, though there have been significant changes with the release of Version 3.
I’ll start by showing how to start a project and select an appropriate template for the type of book you are writing. In these first steps, we’ll discuss the Scrivener interface options, including tailoring it to your own preferences.
A broad topic that might not apply to everyone is importing, whether importing material to a research folder or bringing in a half-finished project from the likes of Word or other text editors when you discovered they really are not suited to long-form writing.
We’ll dive into one of the great features of Scrivener, the Binder, covering splitting large documents into smaller individual documents and re-arranging content.
A significant point that differentiates Scrivener from straight word processing is the multitude of view modes available from full-featured to the distraction-free editor only options. We’ll step through the modes and discuss some of the benefits of those options.
We’ll discuss other menu options, including search and replace within your document, links to media and resources on and off your local computer, and entering metadata.
We’ll also discuss the importance of backups and several safe strategies, including local and cloud options. We’ll briefly discuss synching should you also have Scrivener on iOS.
Finally, we’ll delve into the daunting for some topic of compiling for various output options, including PDF, Kindle, and ePub. This topic on its own could warrant a separate book; however, the aim in this book will be to impart sufficient knowledge to compile to the most common formats and achieve a professional finished product.
Menus
Throughout this book, I may refer to menu options from the Scrivener Main Menu. The format I shall use is relatively standard in the industry.
1. It starts from the Main Menu, which is the top menu bar in the Scrivener window.
2. The menu selection begins with the Primary menu option from that bar,
3. Then the Secondary and so on to the menu item selection.
File > New Project, signifying, select the File menu from the Main Menu (The menu bar across the top, per the screenshot) then within that menu New Project.

Before you finish this book, I trust you will be enthused to launch into your own project, knowing that Scrivener provides the best platform for successful writing.